Showing posts with label recipes. Show all posts

Saturday, March 19, 2011

Spring Fun: Sorbetto

Mashing the grapes for grape-mint-lime sorbetto (last summer).
Sorbetto is best the day it is made, but I'll eat it anytime.

Last summer, I borrowed a friend's ice cream maker for a few weeks. The result was a series of sorbetto experiments. Our favorites, the aforementioned grape-mint-lime and nectarine-apple with maple syrup. With the help of our juicer the possibilities are endless.

I'm still fiddling with the sugar substitutes/concentrations to make something low sugar - maybe this summer I'll be more successful. The grape-mint-lime was made with 1/2 the amount of sugar that the recipe called but the texture was more granada-like and there would have been no way it would form "scoops."

I used this Lottie + Doof Framboise Lambic Beer Sorbetto recipe, which was adapted from The Ciao Bella Book of Gelato and Sorbetto by Pearce and Zecchin, for the proportions.
  • ~4 cups fresh fruit juice of your choice
  • 1 lemon (juice only)
  • Simple Syrup (1:1 water and sugar)

Over medium heat combine water and sugar. Whisk often and simmer until all of the sugar is dissolved. Remove from heat and let cool.

This is where things get a bit tricky - how to add sugar syrup while taking into account the sugar content of the fruit you used. I am no expert but will point you to this technique over at Fresh Sliced Fruit Daily. Look toward the bottom of their Tangerine and Grapfruit Sorbetto recipe, hint: it involves a raw egg.

photo credit: Cayenne 07.19.10


Saturday, November 27, 2010

Quick Dinner: Veggie Soup Base

Looking for a way to use up some turkey leftovers? Try my quick dinner veggie soup base. I normally bake some foccacia during the time it takes to make the soup base.

The secret ingredient is a German seasoning called Seitenbacher Vegetarian Vegetable Broth and Seasoning. I found it at Rainbow People whole foods grocery store in Juneau. Silly me for rationing my one small bottle when you can go buy loads of it on amazon right here. It is cheap, ~1$/ounce, light weight, and vegetarian making it perfect for backcountry travel or the urban hiker who has to hall their groceries for blocks (yup, that is me on both accounts).

Vegetarian Broccoli Soup Base - perfect for Thanksgiving leftovers
Inspired by GP's Detox broccoli and arugula soup recipe, I blogged it here.

Makes 2 servings (multiple 4-6 times to make enough for freezing)

1 tbsp olive oil
3 cloves garlic minced
1 onion chopped (any kind you have on hand)
1 head broccoli chopped (including the thick stems)
2 1/2 cups water + Seitenbacher (according to directions for amount of water)
1/4 tsp course salt
1/2 lemon juice

Saute the onion and garlic in the olive oil. Once onion is soft add your water and Seitenbacher. Bring to a boil, turn down heat, and simmer until the broccoli is soft (~20 minutes). Purée with an immersion blender in the pot or transfer to a regular blender (be careful blending hot liquid and don't fill the blender more than halfway full). Freeze all your extra soup base in tupperware or ziploc bags (lay flat on cookie sheet until frozen to have stackable units).

Now comes the fun part. Clean out your fridge and add whatever looks good, e.g. brussel sprouts. After Thanksgiving we torn up some turkey and threw in some mini tortellini (the dried kind from Trader Joes). Simple. Your done. Enjoy!

photo credit: Cayenne 06.22.10

Monday, May 17, 2010

Washington, DC: Julia Childs' Kitchen


This is my last post on my recent trips to Washington, DC. Saving the best for last, I say. After our walk through the National Sculpture Garden my friend LMH and I ran into the Natural History Museum to gawk and peer at Julia Childs' kitchen!

The little blue kitchen was packed with cooking paraphernalia and trinkets. It felt lived in, and used, exactly how a kitchen should feel in my opinion. I loved the table in the middle of the kitchen, cuz it reminded me of my own childhood kitchen where the kitchen table was where we did craft projects, cooked dinner, and did homework.

Monday, April 5, 2010

Wake-up: Juneau Wild Oven Bread Share

With just 13 days left in the 2010 Legislative Session, I will be leaving Juneau not long after the gavel is dropped. One of things that I will miss about Juneau is the Wild Oven Breadshare. My roommate and I have been getting a freshly baked loaf of bread each Saturday and it totally makes my entire week. The bread is hardy, none of that cardboard tasteless white stuff, and is as fresh as can be.

If you sign up and pay your dues then each week you can pick your bread (after 3p on Saturday) in the lobby of the Rainbow People Food Store. No worries if you forget on Saturday, I am sure it will still be there on Sunday. I know from experience on this one.

The Wild Oven owner and baker has made some changes to the breadshare for the spring/summer season. The changes offer greater flexibility and I hope it convinces you that you NEED to eating Wild Oven fresh bread. Now you can order online, can skip weeks, can order up to 3 loaves/wk, and there are three bread choices per week.


The Wild Oven breadshare starts Saturday, April 17th. You must purchase 10 loaves to reserve your share at just $6 per loaf.

Soon you will be able to sign up here on the Wild Oven "under construction" website. In the meantime keep track of them on Facebook, Wild Oven. For more info contact the Wild oven baker at
wildoven@gmail.com

photo credit: Cayenne

Sunday, December 6, 2009

Sunday Supper: Sorrel Pesto

Sorrel showed up in my organic CSA food box over the summer. In a pinch and short on time, I blended it up into a wonderful, tangy pesto. You are going to love how quick and easy this is after all that hard Thanksgiving cooking. Sorrel looks like a longer, skinnier spinach and it has a lemony taste. Read more about this magnesium and calcium-rich green here.


Sorrel Pesto
by Cayenne

Serves 2-4, freeze the leftovers

1 bunch sorrel
4 garlic cloves
2 handfuls shaved Parmesan cheese
3-5 tbsp olive oil (your favorite stuff)
1 handful pine nuts
Salt + pepper to taste

Wash sorrel as you would any other leafy green. No need to spin off the water. In a mini cuisinart (or whatever blending tool you have). Add handfuls of leaves, garlic, 1-2 tbsp olive oil. Whiz. Whiz. Whiz. Keep adding sorrel leaves and olive oil until a slightly dry paste is formed. Thin out the paste with a few tbsp of water. Whiz in the pine nuts. Taste. Add salt + pepper and cheese. Whiz. Throw over your favorite pasta. Maybe add some fresh tomatoes, olives, and parsley. I freeze the leftovers in small tuppers, they defrost well in the microwave.

These weeks are flying by, next week's Sunday Supper will be sweet and a bit more festive.


photo credit: Cayenne 08.16.09

Sunday, November 29, 2009

Sunday Supper: Lentil and Sausage Soup

Cayenne & Carob's Sunday Supper: Clean-out-the-fridge Turkey (or Chicken) Soup.

I made this soup back when I "tried" to
roast a chicken (on the list for a redo next year). I think it would be perfect when made with turkey stock. I hope you remembered to save your turkey carcass from Thanksgiving dinner! See Thursday's post to read about preparing homemade stock. Stock keeps forever in the freezer but only a few days in the fridge. Jar it and freeze it. Might as well make extra soup and freeze that too.

Lentil + Sausage Soup
By Cayenne

Hot Italian Sausages, sauteed and broken into smaller pieces
1 onion, chopped
1-2 cloves garlic, minced
8-10 cup of turkey or chicken stock
handful or two of mixed, dried lentils (bulk aisle at whole foods)
1 bunch kale or chard, destemmed (use the stems but add them earlier) and chopped
handful of cubed, cooked potatoes
cayenne pepper
salt + pepper

In a largish soup pot saute the sausage (you want the pot to be big enough for the entire soup). Once the sausage is browned add the onions, cook for 1-2 minutes. If there is a lot (more than 2 cm) of grease in the pan drain some of the grease off. Otherwise go ahead and use it for flavor. Throw in the garlic and cook until fragrant. Add the stock and lentils, bring soup to a boil, turn down heat and simmer for 30-45 minutes or until the lentils are soft.

You can stop at this point and freeze the soup for later when you can add whatever you can find when you defrost it. The rest of the recipes depends on what you are adding to the soup. Always add things that take longer to cook first and the more delicate veggies near the end, e.g. any greens or already cooked squash or potatoes. Carrots, the woody stems of kale and chard, or uncooked potatoes will take a bit to cook so add those early on in the cooking process.

Taste at this point so that you can add cayenne pepper, salt, fresh black pepper to suit your spice preference. I use very little salt in my food because my mom never salted anything and TEB just happens to be really sensitive to salt. For this particular soup I would not add any spices until the very end. The sausage adds a lot of spiciness and salt so I would not be surprised if the soup only needs a touch of pepper.

photo credit: Cayenne 08.09.09, 09.11.09

Sunday, November 22, 2009

Sunday Supper: Ina Garten's Red Spaghetti Sauce

Cayenne & Carob's Sunday Supper: Ina Garten's Red Spaghetti Sauce from Barefoot Contessa Family Style Cookbook.

Pasta is a good ol' standby in my house. One can always find various kinds of pasta (Swiss Egg Noodles, organic whole grain penne etc) and a jar of pasta sauce hidden somewhere in the kitchen. Jarred pasta sauce is always a little bland so I saute up some onions and garlic, maybe throw in some kale or whatever left over veggies are in the fridge. I always thought homemade red sauce was this extra step that I could not possibly have time to do. It was only recently that TEB and I found crushed tomatoes in the pantry and were forced to make the stuff from scratch. It turned out delicious, I might never go back to the jarred stuff. Well maybe only as a second backup.

Barefoot Contessa's Red Spaghetti Sauce
by Ina Garten, Barefoot Contessa Family Style

1 tbsp olive oil
1 cup chopped yellow onion
1 1/2 tsp minced garlic (double if you love garlic, like i do)
1/2 cup good red wine (used whatever old stuff was in the fridge)
1 28-ounce can crushed tomatoes
1 tbsp chopped fresh parsley
1 1/2 tsp kosher salt
1/2 tsp freshly ground black pepper

Heat the olive oil in your favorite pan (for some flavor I use my cast iron pan). Saute the onions until they are translucent, then add the garlic. Cook until very fragrant ~ 1-2 minutes.

Add the wine and cook on high heat until almost all the liquid evaporates (4-5 minutes). Add the canned tomatoes, parsley, salt, and pepper. Simmer on low heat for 20 minutes.

Serves 6, with 1 1/2 pounds cooked pasta and lots of shaved Parmesan. I pile on the black olives and leave them off for TEB who is a member of the "I hate black olives club." This is another recipe to keep on file for when you are cooking for a crowd.


photo credit: Cayenne 09.23.09

Saturday, October 31, 2009

Sunday Supper: Roasted Pumpkin Seeds + Mulled Cider

Cayenne & Carob's Sunday Supper: Roasted Pumpkin Seeds + Mulled Cider

There are many things I love about fall but two of my favorites are roasted pumpkin seeds and mulled cider. I have to confess that my most recent attempt at roasting pumpkin seeds has been my one-and-only success. Mulled cider is so easy to make, especially once I tell you my little trick - pre-packaged mulling spices. I keep the pantry stocked because you never know when you need to spice up that old red wine or to warm your insides with some delicious cider. The recipe is very simple: Heat your beverage of choice (red wine or apple juice) with 2-3 tablespoons of mulling spices over the lowest heat setting as possible for 30 minutes. That. is. it. Now keep reading for the easy roasted pumpkin seeds recipe.
Roasted Pumpkin Seeds
By Cayenne, adapted from NW

Spray oil
Sesame oil
Salt & Pepper
special seasoning (optional)
cookie sheet
Preheat oven to 350 degrees.

1. Rinse your pumpkin seeds well and get all the little bits of pumpkin outta there. Spread on a clean kitchen towel and pat dry or let them air out for a bit. Take a cookie sheet and spray with a bit of olive oil (I use the Misto Olive Oil Sprayer).

2. Put the pumpkin seeds into a small bowl and add a drizzle of sesame oil, mix well. Spread seeds in a single layer on the cookie sheet. Give them lots of room. Crank some freshly ground pepper over them.

3. Now comes the part where you can dive into your spice drawer and use just about anything to seasons these guys. I used
Denali SP'ICE Alaskan Alder Smoked Sea Salt for one batch and Tony Chachere's Creole Seasoning for the other batch. My favorite was the alder smoked salt.

Bake for 5-10 minutes but check them often.


photo credit: Cayenne 10.23.09

Sunday, October 25, 2009

Sunday Supper: Vegan Asian-style Lettuce Wrap

Cayenne & Carob's Sunday Supper: Vegan Asian-style Lettuce Wraps

I was inspired to create this recipe after envying all the people eating vegan lettuce wraps at my friends' spectacular wedding. Their entire menu was vegan and unfortunately for me the lettuce wraps had cilantro (yes, I am one of those cilantro haters). Everyone raved about the deliciousness of the lettuce wraps and I wanted some too.

Vegan Lettuce Wraps
by Cayenne, sauces from RecipeZaar

1 package veggie ground (I don't have a brand preference just as long as it is plain flavored)
couple cups green cabbage shredded
handful shitake mushrooms, sliced
3 cloves garlic, minced
2 green onions, sliced and separated into green portions and white portions
1-2 tablespoons ginger, grated
water chestnuts, canned and sliced
1 head butter lettuce

Stir Fry Sauce:
2 tbsp soy sauce (or tamari)
2 tbsp brown sugar
1/2 tsp rice wine vinegar

Special Topping Sauce:
1/4 cup sugar
1/2 cup water
2 tbsp soy sauce
2 tbsp rice wine vinegar
2 tbsp ketchup
1 tbsp lemon juice
1/8 tsp sesame oil
1 tbsp hot mustard
2 tsp water
1-2 tsp garlic and red chile paste

The key to stirfrying all this up is to having prepped before you start cooking and to add spices until it "smells fantastic." Seriously, you want to smell that ginger and garlic as it cooks in the pan. I store the ground filling, lettuce, and sauces all separate in the fridge so it makes a great lunch for the next few days.

1. Prep all stir fry ingredients and mix up the sauces.

2. Heat sesame oil in large frying pan or wok. Dump in the veggie ground and cook until heated all the way through.

3. Add the garlic, onions, water chestnuts, and mushrooms to the pan. After a few minutes throw in the ginger. Now it should start smelling delicious. When almost done add the stir fry sauce. Cook until cabbage is tender and the mushrooms browned.


4. Plate the stir fry into lettuce cups and drizzle with the Special Sauce.

photo credit: Cayenne 10.18.09

Sunday, October 18, 2009

Sunday Supper: Jamie Oliver's Grilled Mushroom Risotto

Cayenne & Carob's Sunday Supper: Grilled Mushroom Risotto from Jamie Oliver's book Jamie at Home, recipe here.
Grilled Mushroom Risotto

Adapted slightly by Cayenne, from Jamie Oliver's cookbook
Jamie at Home

6 ⅓ cups chicken stock (approximately and definitely used homemade)

Handful dried porcini mushrooms (could not find any)
Olive oil 1 small onion, peeled and finely chopped
2 sticks celery, trimmed and finely chopped (was out of celery)
14 ounces risotto rice - found at Whole Foods on the top shelf of the rice section)
⅔ cup white wine (or vermouth)
Sea salt and freshly ground black pepper
4 large handfuls wild mushrooms, cleaned and sliced (don't use button mushrooms) Few sprigs fresh tarragon and/or parsley, leaves picked and chopped
1 lemon, juiced
2 tablespoons butter
2 handfuls freshly grated Parmesan, plus extra for serving
Extra-virgin olive oil

1.Saute the onion (and celery if you got it) with the olive oil. Turn up the heat and add the rice. Mix well with the onions and get coated in oil. Add the wine and keep stirring until the rice has soaked up the wine.

2. Add a ladleful of stock, slowly and gently stirring the rice so that it does not stick. Keep up the simmer and adding stock after each batch has been sucked up by the rice. Taste the rice every so often to see if it is done. This step took ~30-40 minutes. Turn the heat down to a simmer and keep adding ladles of stock.

3. When you think the rice is just al dente, take a dry large cast iron pan and grill the mushrooms until they are juicy and soft. Throw the mushrooms and herbs into a bowl, squeeze half a lemon over them, and maybe at a touch of salt (I did not add any extra salt).

4. Remove the risotto from the hot burner and stir in the butter and the Parmesan. I had to adjust with a bit more stock and cheese. Keep gently folding the cheese in until you get a creamy texture.

5. Put a lid on it and let the risotto sit for 3-4 minutes. Pour yourself a glass of wine (ya know the rest of the white wine that you used at the beginning of the recipe).

6. Plate the risotto with a pile of mushrooms, dusting of Parmesan, and a sprinkle of fresh parsley.

Our friend AD was over for "dinner" (it was 10:30p by the time this dish was done) and everyone declared it a success. I had to alter the recipe quite a bit and the risotto was still delicious. I will be making this again as I have since found dried porcini mushrooms.

If you can find the dried porcini mushrooms. Add this step at the beginning: heat the stock to a low simmer. In a bowl cover the porcini mushrooms with hot stock and let sit until soft (just a few minutes). Reserve the stock but remove remove the porcini and chop. Add the porcini after the wine has been absorbed. Continue with step 2 above.

photo credit: Cayenne 10.09.09

Sunday, October 11, 2009

Sunday Supper: Jamie Oliver's Old Fashioned Sweet Shortcrust Pastry

Cayenne & Carob's Sunday Supper: Old Fashioned Sweet Shortcrust Pastry for making Sweet Pies straight from Jamie Oliver's book Jamie at Home, recipe here.

Making pie crust is scary because the results are highly variable, at least in my experience. I was looking for a go-too pie crust that I could count on and I believe Jamie's recipe is just that recipe. I was surprised at both how stressful it was to make this crust and how easy it will be to make it in the future. Just do a little practice before bringing this out for Thanksgiving.

Pie Crust Recipe
makes about 2 pounds

3 1/2 cups organic, all-purpose flour, plus extra for dusting
1 cup icing sugar (confectioner's or powdered sugar), sifted
1 cup plus 2 tbsp good quality cold butter, cut into small cubes
zest of 1 lemon
2 large free-range or organic eggs, beaten
a splash of milk (substituted soy)

I really think having cold butter is the key here. You don't want to change the chemistry or consistency of the butter before or while it is combined with the flour. Chill your butter and a large cookie sheet in the fridge before starting.

1. Cube the butter and put it in the freezer while you prep the flour (~5-10 minutes).
2. Sift the flour from a height (12 or so inches high) onto the cold cookie sheet.
3. Quickly, but thoroughly, work the butter into the flour by smooshing it between your thumbs. When the mixture is a fine crumb add the lemon zest (or orange zest, pinch of cinnamon, nutmeg, cocoa powder, or vanilla seeds)
4. Beat the eggs lightly and add to the flour/butter mixture. Add a splash of milk as you gently work the mixture into a ball.
5. Divide into 2 balls. Flour lightly and pat it into a flat round. Wrap each round with saran wrap and let it rest in the fridge for at least 30 minutes.

That is pretty much it! Mix up your fruit with your favorite spices and maybe some agave syrup (or sugar if that is your preference). Roll out your crust and be inventive with shapes and pans.

I had company over for this pie crust making extravaganza. One friend brought fresh tiny apples from Julian so we used those for the filling. We made 6 muffin-size pies and a regular pie with a bottom and top. In addition I was able to make a regular pie with a lattice top. It really was so easy. Now go make some pie crust!

photo credit: Cayenne 09.20.09

Sunday, September 27, 2009

Fall Figs: Baked Figs with Frozen Yogurt

Almost one year ago I posted about these delicious baked figs. Well, I snagged some organic black mission figs from the LJ farmers market and baked them up again. This time I got pictures!
Baked Figs
from The Amateur Gourmet, slight adapted by Cayenne

5-8 black mission figs
vanilla extract
orange, zest, juice (blood orange is fantastic)
¼ cup honey or agave syrup

1. preheat the oven to 375
2. Take the figs and slice them, part way down, into quarters. They should still be attached but be able to splay open. Place them in a baking dish and zest an orange over them. N.B. zesting is optional as I used frozen ice cubes of blood orange juice and was w/o peel to zest - still tasted good!
3. In a small bowl mix the juice from the orange with a tsp of vanilla and 1/4 cup of honey. Pour over the figs.
4. Bake for 10 minutes and baste frequently. cook for another 10 to 15 minutes until fruit is soft. Remove from the oven and let cool.
5. Plate in a shallow bowl with a bit of your frozen treat of choice, soy dream vanilla or vanilla frozen yogurt are my favorites, and top with a fig plus extra a drizzle of hot juice.

I love this recipe because it really is showy and will wow your friends and family, but it is easier than pie. Yup, that is a hint for next week's Sunday Supper, see you there.

photo credit: Cayenne

Sunday, September 20, 2009

Sunday Supper: Homemade Pizza

On the Cayenne & Carob Sunday Supper menu today is homemade pizza with Jamie Oliver's The Quickest Tomato Sauce!
Seriously, it tasted as good as it looks!

First get the dough started in your bread machine. That takes a good 1.5 hours before you need to pay attention to it again. In the meantime, make the pizza sauce. Despite the title as the "quickest" pizza sauce, I don't think it lived up to its name. The "Quickest" Tomato Sauce
Slightly adapted by Cayenne from
Jamie Oliver at Home

Olive Oil

8 cloves of garlic, peeled, sliced

bunch of fresh basil, destemmed, leaves torn

24 ounces of chopped tomatoes with Italian herbs

Salt and Pepper to taste

Sure, it has a few simple ingredients but the process is a bit more complicated. After an hour of simmering, I had to shove it through a strainer and cook it another 30 minutes to come up a flavorful, bold pizza sauce with the right consistency.
By this time the dough should be done. I royally screwed up this next part because I don't like to follow recipes or rather I don't read them carefully. I was suppose to divide the dough into fourths, kneed it, and then set it in a warm spot to rise again (~20 minutes). Then the dough can be shaped, or refrigerated for 24 hours, or frozen for use up to 3 months later.

Instead, I threw the dough, wrapped in plastic, in the fridge (it was early afternoon and I wanted to cook it in the evening). TEB read the dough instructions more carefully and realized my error on that rising-step. He improvised by throwing the dough in the oven on warm for 10 minutes. With no visible rising-action going on and now with crusty dough, I shaped it, threw it in the oven for 8
minutes at the highest temp the oven will go. Get all your pizza toppings ready while the pizza crust is in the oven. We used fresh sliced mozzarella, torn basil, sliced fresh mushrooms, shavings of Parmesan, precooked hot Italian sausage, and a drizzle of olive oil. Cook the pizza for 8-10 minutes until the top is golden and bubbly.

N.B. Crust: the crust turned out just fine, though I do think I have plenty of room to improve. I had a dough ball in the fridge in the fridge that we cooked the next day. It was still good. I also froze a dough ball to test out this whole freezing process. Apparently all I have to do is put the frozen dough in the fridge for 24 hours and then let it sit on the counter for 20 minutes before trying to shape it into a flat pizza crust. I'll let you know how that goes because this homemade pizza has the potential to be a Quick Dinner.


photo credit: Cayenne 09.13.09

Sunday, September 13, 2009

Sunday Supper: Jamie Oliver's Cheeky Chili Pepper Chutney

Yup, you guessed it, I finally found something that requires copious amounts of red chili peppers (remember those serranos I've been bragging about). On the Cayenne & Carob Sunday Supper menu today is Jamie Oliver's Cheeky Chili Pepper Chutney!

yum, I topped fresh fish tacos with the chili chutney!

Cheeky Chili Pepper Chutney (halved "test" recipe)
Adapted by Joanna of Joanna's Food from Jamie Oliver at Home


4-6 hot red chillis
4 red, orange, or yellow bell peppers
EVOO
1 chopped white onion
sprig of chopped rosemary leaves
1 bay leaves
1 cinnamon stick
salt and pepper (optional because I forgot to add)
1/2 cup brown sugar (while converting from the metric system I forgot to halve)
1/3 cup balsamic vinegar

Slowly cook the onion in a bit of oil with the herbs. This takes quite a while and you are looking for some translucent, soft yet golden onions in the end.

Meanwhile, I got out my mini cuisinart chopper and whizzed the bell peppers. Then I donned some rubber gloves and deseeded 'n decored the hot serrano chili peppers.

By this time the onions should be ready and you can add the chillis, peppers, sugar, and vinegar. Once again cook this slowly until there is very little liquid and the texture is goopy, takes about an hour. This halved recipe only makes about 18, or so, ounces of chutney. If you are going to can this chutney get started on sterilizing the jars while you are waiting for the chutney to cook down. Boil a big (HUGE) pot of water. Put your jars and lids into the boiling water for at least 10 minutes. Turn off heat. I left the jars in the water until the chutney was ready.

When you have deemed the chutney done, turn off heat and remove the cinnamon stick, bay leaves, and rosemary twigs. Remove the jars, one at a time (this is where I learned the importance of canning tongs) and carefully spoon the chutney into the hot jars. Leave about 1/4 of an inch room on the top and tighten the lid. Bring the water you used to sterilize the jars to a second roaring boil. Place the chutney jars into the boiling water and let boil for 10-15 minutes. Remove the jars again and let them rest on the counter. At some point, when the lid has sealed, you should hear a PoP! Either my jars did not pop or I did not hear it because I was sleeping. So I am keeping my jars in the fridge instead of on the pantry shelves.

TEB declared the chutney a success and ate it atop fish tacos for two days. In my opinion I was too conservative with the chili:bell pepper ratio - the chutney needed to be spicier. No worries, I am going to try again in an attempt to use all 18 red chillis on my pepper plant.

photo credit: Cayenne 09.06.09

Monday, September 7, 2009

Wake-up: Iced Coffee

It has been too hot for regular coffee so iced coffee has been my staple these last few weeks. This recipe comes straight from Smitten Kitchen and I've been making it this whole year since she first posted it.

Iced coffee is super easy to make: mix coffee grounds and cold water together before you go to bed (~ 1:3 proportions). Wake up in the morning and strain the coffee grounds out using a sieve (fine grade mess or cheese cloth). I mix mine with Soy Dream Vanilla Soymilk (3:4 coffee to soy) and call it a good (no, great) morning. The iced coffee keeps in the fridge for 2-3 days, after which I freeze the leftover in the ice cube tray and save for chilling my iced coffee or for when a recipe calls for a bit of coffee. Easy as pie. Just got to remember to make it the night before.

I find that you can use cheaper coffee than if you were making a pot using an
Italian Bialetti stove-top espresso maker. My favorite is Cafe du Monde (New Orleans, LA). This comes ground and in nice orange (chicory) or blue (french roast) tins which I'm saving. You can buy Cafe du Monde at Cost Plus World Market (along with their biegnet mix) or Ranch99 here in San Diego, CA.

Sunday, September 6, 2009

Sunday Supper: Summer Cold Tapas

Sunday Supper Menu:
Freshly Pickled Cucumbers

Watermelon, Mint & Feta Salad
Salmon 'n Avocado Crostini


With the steady high temperatures on the coast
, I was in no mood to turn on the stove for anything. So I made an entire Sunday Supper without using heat. Alright, alright. I did toast the herb butter bread for a minute but that was it. Once again I challenged myself by making a food that I normally avoid - white, creamy sauces. The watermelon salad has a feta and mint dressing that is made from a greek yogurt base (lots of white going on there). And the salmon crostini was topped with homemade mayonnaise (I avoid mayonnaise at all costs).

Pickled Cucumbers (prepared a few days ahead of time) by Penelope Casas, Tapas: The Little Dishes of Spain

2 kirby (bumpy) cucumbers, peeled and quartered lengthwise

Coarse Salt
Tarragon vinegar
Water
4 peppercorns, crushed
1/2 teaspoon fennel seed
1 clove 1 small bay leaf 1/2 small onion, slivered
1 clove garlic, peeled and halved
Sprinkle the cucumber quarters with salt and leave in a colander to drain for 1 hour. (Ran to the grocery store during that hour) Cut each quarter into 1-inch chunks. Place in glass jar and cover with vinegar and water in the proportion of 1:2. Season with salt, peppercorns, fennel seed, clove, and bay leaf. Add onion and garlic, cover, and refrigerate for a few days. Cucumbers will last a few months.

N.B. Tarragon vinegar? Good thing I made these on Friday night. Where do buy such a thing when one did not think ahead. No idea. The local grocery store did not have it so I just added some dried tarragon to white wine vinegar.


Chopped Vegetables, Watermelon, Mint & Feta Salad
Adapted by Smitten Kitchen from Bon Appetit

1 pint grape tomatoes, quartered

1 1/2 cups diced watermelon, seeded if necessary

1 large green bell pepper, seeded, cubed

2 kirby cucumbers, cubed
1/2 cup very thinly sliced radishes

3 tablespoons olive oil, divided

8 ounces feta cheese crumbled
1 white onion, chopped, divided

1/4 cup thinly sliced fresh mint leaves, divided

1/2 cup plain Greek-style yogurt

1 teaspoon dried oregano

Combine tomatoes, watermelon, green pepper, cucumbers, radishes, and 2 tbsp EVOO in a medium bowl. Add half each of feta, onions, and mint. Mix remaining feta, onions, mint, and oil in food processor. After mixed well, add yogurt and oregano. Pulse to blend and season with a little pepper. I left the dressing on the side so people could add as much as they wanted. I found that I wanted just a tablespoon but I'm sure that has something to do with my fear-of-white-sauces-thing. Keeps for 3-4 days and makes about four servings.


Salmon 'n Avocado Crostini

Adapted by Ca
yenne, inspired by Smoked Fish on Avocado Rounds recipe from Tapas: The Little Dishes of Spain by Penelope Casas

1 small avocado
1 pint canned salmon
2 stocks celery, small dice
3 dill pickles, small dice
1 tablespoon Dijon mustard
Salt and Pepper to taste
Hard rye crackers or freshly toasted bread
Homemade Mayonnaise (recipe below)

Drain, flake, and check for bones in the canned salmon. Place into a bowl and add the celery, onion, and pickles. Mix well. Add tablespoon each of Dijon mustard and extra virgin olive oil (may have to adjust depending on how well the salmon is sticking together looking for tuna salad consistency here). Salt and pepper to taste (careful with the salt because canned salmon and the pickles are salty - I rarely have to add salt). Toast bread and layer avocado and then salmon salad on top. Drizzle with homemade mayonnaise and garnish with parsley (optional).

Mayonnaise (makes 1 1/4 cups)

1 egg plus 1 yolk
1/4 teaspoon Dijon-style mustard
1 teaspoon salt
2 tablespoons fresh lemon juice
1 cup olive oil, or a mixture of olive and another vegetable oil

Place the whole egg, egg yoke, mustard, salt, and lemon juice in a bowl and blend well. Whisk with one hand and drizzle in the oil very gradually. Continue beating unil thick and silky. Takes about 10-15 minutes. Lasts for 2 days in the fridge - of course any raw egg is eaten at your own risk.


N.B. check how fresh your eggs are! fill a bowl with water and gently drop your raw egg into it. If it floats then you better cook the blazes out of that egg, if it sinks fresh off the farm.

photo credit: Cayenne 08.30.09

Sunday, August 30, 2009

Sunday Supper: Fried Eggplant and 3-minute Swiss Egg Tapas

Cayenne & Carob's Sunday Supper: Fried Eggplant and 3-minute Swiss Egg Tapas
I had no idea what I was going to make for sunday supper and relied on finding something beautiful and tasty at the La Jolla Farmer's Market. It was the eggplant that spoke to me and later caused me to take every cookbook down off the kitchen shelf to find the perfect, easy recipe. I indeed found a great recipe!

Fried Eggplant and 3-minute Swiss Egg Tapas
By Cayenne and inspired by Fried Eggplant with Garlic and Egg Recipe from Tapas: The Little Dishes of Spain by Penelope Casas

1 eggplant, slice four 1/4-inch slices (for 2 people)
coarse salt
white flour for frying eggplant
sunflower oil for frying
2 soft- or hard-boiled eggs
4 garlic cloves
1 onion
handful of cremini, brown, button mushrooms
1 orange bell pepper
handful of fresh parsley
pinch of dried thyme
Eggplant: First slice the eggplant and sprinkle with salt and let sit in colander for 30 minutes (water will seep out). Wrap uncut eggplant in plastic wrap and save for later in the week.

3-minute Swiss Egg: Bring water to a roaring boil, add salt, and gently drop fresh eggs into water. Turn your timer to 3 minutes or if you have my timer 5 minutes. Remove eggs from water and set in a bowl to cool.
Sauteed onions and vegetables: I was very liberal in altering the recipe to use what I already had in my fridge. I actually make this dish again later in the week for another friend and switched things to make it more of a main dish.

If you are making an appetizer just saute the onion for a few minutes and add the orange pepper. When the onion is almost done, add the garlic and mushrooms. Once the mushrooms are nice and shriveled turn off the heat and add the thyme and parsley.

If you are making this as a main dish beef it up by adding Israeli couscous mix from TJ's which I started right after I had the eggplant draining. The mix cooks in about 10 minutes and you can time it to finish at the same time as the eggs. For even more sustenance I sauteed sliced fingerling potatoes and a few leaves of sliced swiss chard with the veggies and onions.

Frying the Eggplant: Set your eggplant slices on a clean towel and blot dry. Heat up about 1/2 to 3/4 inches of oil (I used sunflower oil) until it pops when you flick a bit of water in it (like one drop of water). Place the eggplant on a plate and sift flour over it, turn over and do the same thing to the other side. Gently tap excess flour off and place in hot oil. Fry approximately 3 minutes on each side or until golden brown. Drain on paper towels as you continue frying the rest of the eggplant.

Plating: Start by layering the eggplant slices on your plate and sprinkling with salt. Pile on the veggies and top with the 3-minute Swiss egg. Enjoy immediately.

I really loved this dish and I have to fess up to hating eggplant before this most recent Sunday Supper (seeing a theme here). It was easy, took less than an hour to make, and has a stunning presentation. One of the most important elements is the 3-minute Swiss egg. The recipe called for a hard boiled egg. Due to a fluke of not remembering how to cook a hard boilded egg and the fortuitous advice of my friend who was visiting (yes, she lives in Switzerland) - the 3-minute Swiss found its way to the top of my fried eggplant. The egg white was a touch runny so I made the decision on my second run-through to cook it 1 minute longer. Bad. Idea. Keep the 3-minute Swiss egg because it really makes this dish.

photo credit: Cayenne 08.23.09

Tuesday, August 25, 2009

Serrano Peppers: Preserving Options

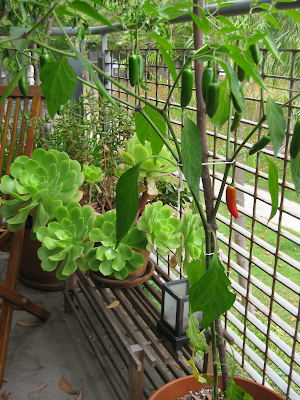
Remember our serrano pepper plant? Well, I've waited long enough to harvest the serranos that now they are turning red! Now the question is what am I going to do with all these peppers (~15).

These little guys are spicy and I clearly need to preserve them all for use later. I read online that they do not freeze well due to how fleshy they are. My friend NA suggested making jam. The whole canning process scares me a little bit so I was thinking of making chutney and then freezing it.
I am considering Jamie Oliver's cheeky chili-pepper chutney, specifically this modified, and simplified, version from Joanna's Food looks like something I can tackle on a weekend. My goal this week is to find canning jars. Looks like I get a trip to my favorite organizing store.

photo credit: Cayenne 08.18.09